What the Solar Generator Panel Setup Process Actually Involves
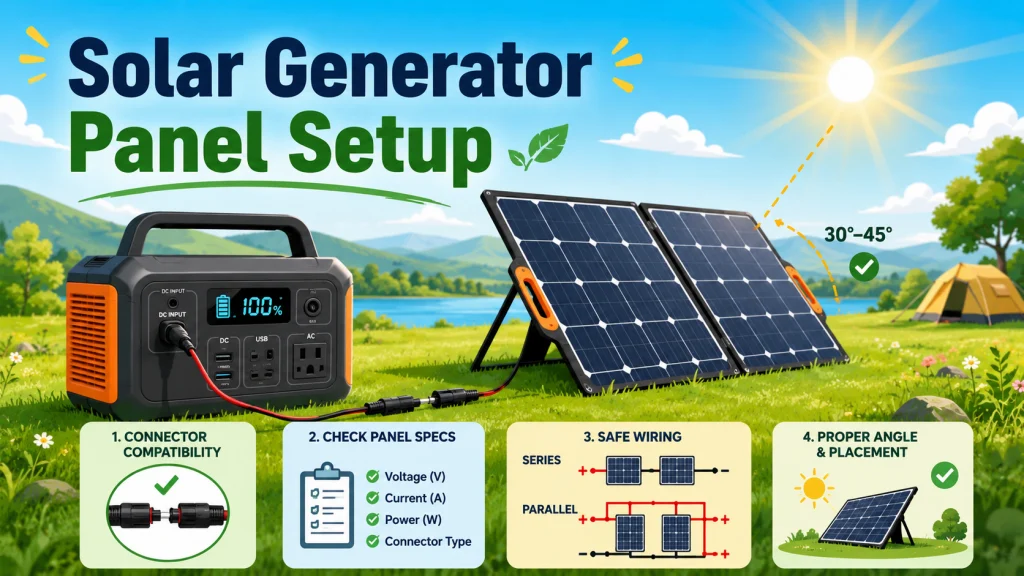
The solar generator panel setup process has more steps than most product manuals suggest. The unit ships with a short cable, sometimes an adapter, and instructions that assume everything will just work. What those instructions do not explain is why the connector type matters before you order any accessories, why the third-party panel you already own might need a specific adapter cable, or why putting the unit in direct sun while charging is quietly costing you input efficiency. These gaps are where most setup problems originate.
In my experience, the owners who get frustrated with their panel output early on are not dealing with defective equipment. They are dealing with one skipped step. A unit charging at half the expected speed looks like an undersized panel. It is often a wiring configuration or angle problem. Getting all four areas right means the setup works correctly from the start rather than requiring troubleshooting after the fact.
Before You Plug Anything In: A Quick Pre-Connection Check
Before ordering adapter cables, adding a second panel, or connecting anything for the first time, there are seven things worth verifying in order. None of them takes more than a few minutes. Skipping any one of them is how you end up troubleshooting a setup that should have worked on the first try. If you are buying accessories or panels specifically for this setup, check these before placing the order.
- Find your unit’s solar input range in the manual or on the spec label: maximum input voltage, maximum input current, and MPPT operating range.
- Find the panel’s Voc, Isc, and Vmp on the spec label. Confirm all three fall within your unit’s input limits before purchasing or connecting.
- Identify the connector type on your unit’s solar input port. Match the adapter cable to that specific connector format, not just the general cable type.
- If the adapter cable is from an unverified source, check polarity with a multimeter before connecting. Reversed polarity produces 0 watts and can cause a fault reading.
- Connect and verify with one panel first. Check the input wattage display in direct sun before adding a second panel or changing the wiring configuration.
- If adding multiple panels, confirm whether your unit’s voltage ceiling allows series wiring or makes parallel wiring the safer choice before making the connection.
- Place the panel in full sun and move the unit to a shaded spot. Run the cable between them rather than leaving both in direct sunlight.
This sequence will not replace the detail in the four sections below, but it gives you the right order of operations before the first connection. The most expensive mistakes in panel setup happen when someone skips step two or step six.
Step One: Identify Your Connector Type Before Connecting Anything
Almost every solar panel on the market uses MC4 connectors for its output leads. Two round locking connectors, one male and one female, color-coded for positive and negative. That is the panel side. The unit side is a different situation. Depending on the brand and model, your solar generator’s input port might be an XT60i connector, an 8mm barrel format, an Anderson Powerpole, or a proprietary format that looks like one of those but is not electrically interchangeable with it. The connector on the panel and the port on the unit are almost never the same type out of the box.
This is not a manufacturing flaw. It is a market reality. The adapter cable that bridges the two connectors is a standard part of any panel setup, not an afterthought. What matters is knowing exactly what connector your unit uses before you order anything. Connecting a cable that physically fits but operates outside the unit’s input voltage range can damage the charge controller. The connector seating cleanly is not confirmation that it is electrically safe to use.
Field Note: The most common setup issue I ran into at the shop was the reversed-polarity adapter cable. Someone would order an MC4 adapter cable from an unverified source, plug it in, and see 0 watts. The panel produced voltage. The unit was fine. The adapter had positive and negative swapped at the output end. It is a manufacturing problem that shows up in cheaper third-party cables more than you would expect. If you get 0 watts on a first connection, check polarity on the adapter before assuming anything is broken.
Beyond polarity, connector formats have changed on several units in recent product generations. An adapter cable that worked on an older model may not physically fit the updated port even if it looks identical. The full connector guide covers the four main connector types, how to identify each one, which adapter cable each unit needs, and how to verify polarity before first use: solar generator panel connectors explained.

This 10-foot, 12AWG copper cable splits from a single MC4 connector into four branch plugs covering XT60, Anderson, DC7909, and DC8020, making it compatible with most major portable power stations on the market. IP68-rated MC4 plugs handle up to 28A with minimal power loss, and thick PVC insulation resists UV, heat, and corrosion. Backed by a 24-month warranty from a US-based company.
Check On AmazonIf you click this link and buy, we earn a commission at no additional cost to you.
Step Two: Verify the Three Numbers Before Connecting Any Panel
Third-party panels work with solar generators. That is the short answer and it is correct. The full answer is that compatibility depends on three specific numbers from the panel’s spec label, not on brand names, marketing claims, or whether the adapter cable fits. All three numbers must fall within your unit’s input specifications. If any one of them exceeds the unit’s limit, you either get no charging or, in the worst case, you damage the charge controller.
The three numbers to check are Open Circuit Voltage (Voc), Short Circuit Current (Isc), and Maximum Power Voltage (Vmp). Your unit’s spec sheet lists its maximum input voltage and maximum input current. The Voc of the panel must be below the unit’s maximum input voltage. The Isc of the panel must be below the unit’s maximum input current. The Vmp should fall within the unit’s MPPT operating range for the most efficient charging. The first number is the one that causes damage if ignored. The other two affect efficiency and charging speed.
- Open Circuit Voltage (Voc): The voltage the panel produces with no load connected. Must stay below your unit’s maximum input voltage. Exceeding this is the compatibility check that matters most for hardware safety.
- Short Circuit Current (Isc): The current the panel produces under direct short. Must stay below your unit’s maximum input current. Exceeding this creates stress on the input circuitry over time.
- Maximum Power Voltage (Vmp): The voltage at which the panel produces its rated wattage under load. Should fall within the MPPT operating range listed in your unit’s spec sheet for efficient charging.
Once those three numbers pass, any panel brand works with the right adapter cable. A standard panel from any reputable manufacturer with published specifications and the correct adapter is fully functional. The brand-native panels sold by solar generator manufacturers use the same technology with proprietary connectors that skip the adapter step, which is convenient but not electrically superior. The complete compatibility check, the panel categories to avoid, and the reality of brand ecosystem lock-in are covered in the article on using third-party solar panels with your solar generator.
Step Three: Wire Multiple Panels Correctly or Risk Damaging the Charge Controller
Adding a second panel is where setup mistakes become hardware problems. The instinct is to connect the two panels together the same way you connected the first one and let the unit handle the rest. That works right up until the wiring configuration sends more voltage into the input port than the unit is designed to accept. Series wiring adds panel voltages together. Two panels each producing 22V open circuit connected in series become 44V going into the unit’s input. If the unit’s maximum input voltage is 30V, that 44V is not a performance issue. It is a damage scenario.
Wiring panels in parallel adds their currents instead of their voltages. Two 22V panels in parallel stay at 22V and deliver twice the current. For most owners with mid-range units and two standard portable panels in the 20 to 22V range, parallel is the correct default. It keeps voltage within a safe range and doubles the input wattage, which is what almost everyone actually wants when they add a second panel.
| Wiring type | What increases | What stays the same | When to use it |
|---|---|---|---|
| Series | Voltage (panels add up) | Current | Unit accepts high input voltage (60V+) and MPPT range benefits from higher voltage input |
| Parallel | Current (panels add up) | Voltage | Unit has a lower maximum input voltage, two standard foldable panels in the 20-22V range |
Series wiring is not wrong. It is the right choice for units with high maximum input voltage ratings where the MPPT controller performs better at elevated voltage. The point is that the correct configuration depends on your unit’s spec sheet, not on a general preference. Getting this wrong is one of the few panel setup mistakes that can cause real hardware damage. The complete decision process, including how to connect multiple foldable panels using MC4 Y-connectors and branching adapter cables, is covered in the article on wiring solar generator panels in series vs parallel.

This plug-and-play connector set lets you wire two solar panels in parallel, including one male-to-two-female and one female-to-two-male adapter, compatible with 14 to 10 AWG solar cable. Built from PPO and tinned copper, it handles 30A and 1,000V DC with IP68 waterproofing and VL94-V0 flame resistance across a working range of -49 to 194 degrees Fahrenheit.
Check On AmazonIf you click this link and buy, we earn a commission at no additional cost to you.
Step Four: Placement and Angle Determine Whether You Get Real Output
A panel connected correctly and lying flat on the ground is producing noticeably less than its rated wattage. A correctly connected panel angled toward the sun in unobstructed sunlight is producing closer to 70 to 80 percent of its rated output. The gap between a flat-lying panel and a properly angled one in real conditions is often 20 to 30 percent more input wattage for the exact same panel and the same time of day. Most owners leave that output on the table without knowing it.
The practical starting point for angle: set the panel at roughly the same number of degrees as your latitude. Someone in Denver or Philadelphia is at about 40 degrees north, so a 40-degree tilt from horizontal is the year-round baseline. In summer, drop the angle by about 15 degrees because the sun is higher in the sky. In winter, add about 15 degrees because the sun is lower. Most foldable panels have a built-in kickstand that locks in somewhere between 20 and 30 degrees, which is suboptimal for winter charging at latitudes above 35 degrees north. Propping the panel against a backpack, a cooler, or a wall to get closer to the correct angle is not improvised. It is just good setup practice.
Direction matters as much as angle, possibly more. In the northern hemisphere, the panel should face south. An east-facing panel peaks in the morning and drops off by midday. A west-facing panel does the opposite. South-facing delivers the best total output across a full charging day. If you can only optimize one variable, get the direction right first and adjust tilt second.
Key point: Partial shade is the single largest real-world output loss for portable panels. One branch shadow across a corner of a 200W panel can cut output to 100 to 120W depending on how the panel’s bypass diodes are configured. Spend 30 seconds checking for shade at the angle and position the panel will actually be in for the full session, not just what is clear when you first set it down.
One placement detail that most setup guides miss: keeping the unit itself in direct sun while the panel charges raises the battery temperature, which reduces charging efficiency and adds long-term stress to the cells. Whenever the setup allows it, place the panel in full sun and run the cable to the unit in a shaded spot. A 3-meter extension cable between the panel and the unit makes this straightforward in most situations. The complete angle and placement guide, including the shade diagnosis process and the unit temperature effect on efficiency, is in the article on solar panel angle and placement for a solar generator.

This weatherproof solar extension cable features male and female MC4 connectors at each end for a secure, lockable connection between solar panels and charge controllers. Sunlight-resistant black insulation protects against UV and outdoor elements, making it a reliable addition to any off-grid solar setup where extra reach is needed.
Check On AmazonIf you click this link and buy, we earn a commission at no additional cost to you.
Final Thoughts: Four Steps, Checked Once, and the Setup Works
Panel setup problems look like hardware failures. In practice, from what I have seen, they are almost always a skipped step in the sequence this article covers. Common causes include a reversed-polarity adapter, a voltage spec nobody checked, panels wired in series into a unit with a low voltage ceiling, or a panel lying flat in partial shade while the unit sits in direct sun. Each of these produces results that feel broken and none of them require warranty service. Checking all four areas in order, before the first connection, takes less time than diagnosing any one of them after the fact.
If you want the broader context for how panel setup fits into owning and operating a solar generator correctly from day one, the complete operational guide to using a solar generator covers the full picture from first charge through long-term maintenance. The four articles below go into the full detail on each step covered here.

Built with A+ monocrystalline PERC cells at 23% efficiency, this 7-layer laminated panel captures sunlight twice to maximize output even in low-light conditions. At just 11 lbs and folding to 20.94 by 26.22 by 0.98 inches, two adjustable kickstands deploy in 10 seconds across multiple angles for all-day sun tracking. Includes MC4 and MC4-to-XT60, DC7909, and DC8020 cables for broad compatibility with EcoFlow, Jackery, Bluetti, and Anker stations, backed by a 12-month warranty.
Check On AmazonIf you click this link and buy, we earn a commission at no additional cost to you.
Panel Setup: The Full Guides for Each Step
Each of the four areas covered above has a dedicated article with the full detail. If one step is where your setup is stuck, or where you want to go deeper before you start, that is the one to read first.
| Article | What it covers |
|---|---|
| Solar Generator Panel Connectors Explained | How to identify the four connector types, which adapter cable your unit needs, and the polarity verification step before first connection |
| Third-Party Solar Panels for Solar Generators | The three-number compatibility check (Voc, Isc, Vmp), which panel categories to avoid, and why brand-native panels create adapter friction by design |
| Panels in Series vs Parallel | How to decide which wiring configuration is right for your unit’s voltage spec, how to connect foldable panels using Y-connectors, and when series wiring becomes a hardware risk |
| Solar Panel Angle and Placement | The latitude-based tilt formula, seasonal angle adjustments, why direction outranks angle as a first priority, and the unit-in-shade efficiency improvement |
FAQs
🔌 Can I use any solar panel with my solar generator?
Yes, as long as the panel’s Open Circuit Voltage (Voc) is below your unit’s maximum input voltage and the Short Circuit Current (Isc) is within the unit’s input current limit. You will also need an adapter cable from the panel’s MC4 output to your unit’s specific input port. Check all three compatibility numbers on the panel’s spec label before purchasing or connecting.
📐 What angle should I set my portable solar panel at?
A reliable starting point is to tilt the panel at the same number of degrees as your latitude. Add about 15 degrees in winter and subtract 15 degrees in summer. For most of the continental US, that puts the angle somewhere between 25 and 55 degrees from horizontal depending on season. Get the panel facing south before adjusting tilt.
⚡ Should I wire two panels in series or in parallel?
Check your unit’s maximum input voltage first. If two panels in series would push the combined voltage above that limit, wire them in parallel. Parallel keeps voltage constant and adds current, which is the safe default for most mid-range units with two standard foldable panels. Never assume series wiring is safe without verifying the spec first.
🌑 Why is my solar generator showing 0 watts with the panel connected?
The most common causes are a loose MC4 connector, a reversed-polarity adapter cable, partial shade on part of the panel surface, or a battery already near 100 percent charge where the MPPT controller slows input significantly. Start with the connectors, check for shade at the actual panel angle, then check the battery level before assuming a hardware problem.
☀️ Does it matter if the solar generator unit sits in direct sun during charging?
It does matter. A hot battery charges less efficiently than one at ambient temperature, and extended heat adds stress to the cells over time. When the setup allows, place the panel in full sun and run the cable to the unit in a shaded spot. A 3-meter extension cable makes this easy in most outdoor setups.
🔧 Do I need a special adapter cable for a third-party panel?
In almost every case, yes. Third-party panels output through MC4 connectors. Most solar generators use a proprietary input port format. You need an adapter cable that connects MC4 on the panel side to the specific connector your unit accepts. Verify the polarity on any adapter cable from an unverified source before trusting the reading on the unit’s display.