Why Angle Matters More Than Most Owners Realize
The first time I set up a foldable panel for a customer demo, I laid it flat on a concrete pad in the parking lot because it was the easiest surface. The unit showed about 120 watts from a 200W panel at noon on a clear day in mid-October. Propped the panel at roughly 40 degrees using a nearby cooler and watched the input climb to 175 watts. Same sun, same panel, same cable. The only variable was the angle.
The physics here are straightforward. Solar panels produce maximum output when sunlight hits the cell surface at a perpendicular angle. The closer you get to perpendicular, the more photons per square inch, the more power. A panel lying flat in a northern latitude catches the sun at a steep oblique angle for most of the day. You are leaving 20 to 40 percent of potential output on the table, depending on season and location. That gap is real and it is easy to close.
For portable setups specifically, the stakes are different than for rooftop installations. A rooftop panel stays fixed for 25 years and gets optimized once. A foldable panel gets repositioned every time you use it. That means you have the opportunity to improve angle every single session, and a few minutes of attention to placement pays off in watts within the hour.

Built with N-Type cells at 25% conversion efficiency, this 15.9 lb foldable panel includes a 30 to 60 degree adjustable bracket with an integrated angle guide for optimal sun tracking throughout the day. ETFE coating and an IP68 waterproof rating ensure durability in harsh weather, and the included protective bag makes transport straightforward for camping, trekking, or road trips.
Check On AmazonIf you click this link and buy, we earn a commission at no additional cost to you.
The Latitude Rule: Your Starting Point Without a Calculator
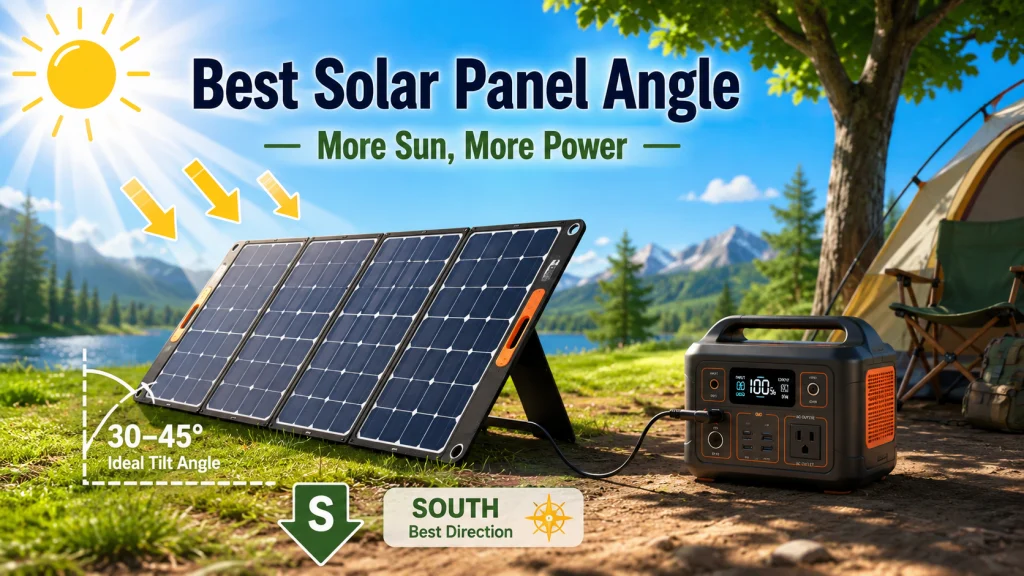
The general rule for portable setups is to angle your panel at approximately your latitude in degrees from horizontal. If you are at 35 degrees north latitude, roughly the latitude of Memphis, Raleigh, or Albuquerque, aim the panel at 35 degrees up from the ground. At 45 degrees north, the latitude of Minneapolis, Portland, or northern Vermont, aim for 45 degrees. This is a good year-round starting point that keeps you close to optimal without pulling out a protractor.
You do not need to be precise. Within 10 degrees of the ideal angle, the output difference is small. The goal is to get in the right range, not to nail an exact number. Most owners who angle their panel by eye, aiming for what looks like roughly 30 to 45 degrees, end up close enough that fine-tuning produces only a few additional watts. The bigger gains come from the other decisions covered below.
Seasonal Adjustments That Actually Move the Needle
The sun’s position in the sky changes with the season, and the optimal panel angle shifts with it. In summer, the sun is higher in the sky and a flatter panel angle captures it better. In winter, the sun is lower and a steeper angle catches more direct light. The practical adjustment is simple: subtract about 15 degrees from your latitude angle in summer, and add about 15 degrees in winter.
For someone at 40 degrees north latitude, that works out to roughly 25 degrees in summer and 55 degrees in winter. A 200W panel in January in Philadelphia set at 55 degrees will outperform the same panel set at 40 degrees by a meaningful amount, especially in the morning and late afternoon when the sun is low. In my experience, the winter adjustment matters more than the summer one because winter charging sessions are already shortened by fewer daylight hours. Getting more out of each hour of sun is worth the extra attention.
| Latitude (degrees north) | Summer angle | Year-round starting point | Winter angle |
|---|---|---|---|
| 25° (Miami, Houston) | 10° | 25° | 40° |
| 35° (Memphis, Raleigh) | 20° | 35° | 50° |
| 40° (Denver, Philadelphia) | 25° | 40° | 55° |
| 45° (Minneapolis, Portland) | 30° | 45° | 60° |
| 50° (northern border, Canada) | 35° | 50° | 65° |
These are starting points, not exact prescriptions. Cloud cover, terrain, and nearby obstructions affect real-world output more than the difference between 50 and 55 degrees. Use the table to get in the right range and move on to the other factors below.
How to Fine-Tune the Angle Using Your Unit’s Input Reading
Once you have the panel roughly at the right latitude angle, you can dial it in without any math. This takes about 60 seconds and uses the input wattage display on your unit as the measuring stick. Set the panel at the starting angle from the table, then glance at the input watts on your unit’s screen. Tilt the panel up or down by about 10 degrees and check the watts again. Hold whichever position reads higher.
That is enough for most portable setups. If you are setting up for a long session, repeat the check once around midday when the sun is highest, since the optimal angle shifts a few degrees from morning to afternoon. In most cases the difference is small enough that one adjustment at setup covers the day well. The input reading also tells you immediately if something else is wrong: if you adjust the angle and the watts do not move at all, shade or a connection issue is the more likely culprit than angle.
Direction Matters More Than Angle
If you can only optimize one thing, optimize direction. In the northern hemisphere, face the panel due south. This is the single most effective thing you can do for all-day output. A south-facing panel at a suboptimal angle will outperform a perfectly angled panel facing east or west across most of the day.
East-facing panels peak in the morning and produce roughly 75 to 85 percent of what a south-facing panel delivers over a full day. West-facing panels peak in the afternoon and perform similarly. Both are real losses that compound across a multi-hour charging session. I have watched charging sessions cut short simply because someone set up the panel on the convenient side of their campsite, which happened to face northeast, and then wondered why their 200W panel was showing 80W by midday when the sun had shifted away from it.
The practical fix is to spend 30 seconds orienting before you set down the panel. On a clear day, find south by looking for where the sun is highest in the sky at midday, or use the compass app on your phone. If shade or terrain forces a compromise, a southeast orientation is preferable to southwest for early-start charging, and southwest is better if you need power in the afternoon.
Key Point: South is the priority. Get direction right first, then dial in the angle. A south-facing panel at a rough angle beats a precisely angled panel facing the wrong direction every time.
Working Around the Fixed Kickstand
Most foldable panels have a built-in kickstand that sets the angle somewhere between 20 and 30 degrees. For latitudes below 30 degrees north, this is close to adequate for summer use. For most of the continental United States, and especially in winter, it is significantly below the optimal angle. A panel in Maine in January sitting at 25 degrees when it should be at 60 degrees is losing a substantial share of available light.
The fix does not require any hardware. Propping the kickstand against a backpack, a cooler, a rock, or a camp chair is enough to raise the angle meaningfully. I have used a rolled sleeping bag, a folded camp chair, and a stack of firewood, depending on what was available. The panel does not need to be perfectly stable, just stable enough not to shift in light wind. If you are going to leave the panel unattended for a multi-hour charging session, a small sandbag or heavy object on the base cable can keep it from shifting in a breeze.
Some owners build a simple adjustable prop from a wooden dowel with a notch cut at a few angle positions. Others use aftermarket panel stands designed for adjustable tilt. Neither is necessary for most casual use, but if you are doing regular charging over multiple seasons, a few minutes of setup time per session adds up to noticeably more watt-hours over time.
Field Note: The most common setup mistake I saw at the shop was customers leaving the panel in its shipped configuration at the default kickstand angle and wondering why charging was slow in December. The kickstand angle that works reasonably well in July in Tennessee is the wrong angle in December, even in Tennessee. Once I showed them the difference between default kickstand and propped-at-latitude-plus-15, most of them started carrying a small bungee cord to create an adjustable prop rig.

This lightweight stainless steel panel stand weighs just 2 lbs and folds flat for easy storage in an RV, tent, or gear bag. Its arc-shaped base spreads weight evenly for stable outdoor use, with rope or ground peg attachment points for windy conditions. Compatible with most foldable solar panels, with smaller panels typically needing one stand and larger 200 to 300W panels working best with two.
Check On AmazonIf you click this link and buy, we earn a commission at no additional cost to you.
The Shade Trap: Small Shadows, Large Losses
Before you finalize your panel placement, check for partial shade. This step takes less than a minute and prevents one of the most common causes of unexpectedly low charging output. A single shaded cell can reduce an entire panel’s output by 20 to 50 percent, depending on how the panel’s bypass diodes are wired. A branch shadow on one corner of a 200W panel can cut effective output to 100 to 120 watts or lower.
The reason for the large reduction is the way solar cells connect in series within a panel. A shaded cell acts like a resistor in the string, dragging down the current of the entire chain it belongs to. Bypass diodes limit the damage by routing current around the shaded section, but the section’s output is still lost. On some panel designs, a shadow covering one cell of a 60-cell panel reduces output by one third.
When I was running my homestead setup through a summer with a row of mature cottonwood trees to the southwest, I lost close to 25 percent of my afternoon output on windy days when branches moved in and out of the panel. The fix was moving the panel 15 feet and losing a small amount of angle convenience. The gain was immediate.
Check for shade from trees, roof overhangs, vehicles, awnings, and poles before setting up. Then check again an hour later, because shade patterns shift as the sun moves. If you are setting up for a full-day session, place the panel where it will have clear sky for the bulk of peak sun hours, which typically runs from about 9 AM to 3 PM. A partially shaded setup during peak hours loses more than a perfectly angled panel in a clear spot gains.
Pro Tip: Set up your panel during the first clear-sky hour of a new location and watch the input wattage reading on the unit for 10 minutes before leaving it unattended. A sudden drop from 160W to 90W tells you that shade is moving across the panel from a source you did not notice at setup.
Put the Panel in the Sun. Put the Unit in the Shade.
This is the most consistently overlooked placement habit, and it is genuinely worth the extra effort. Solar generators charging in direct sunlight get warm, and heat reduces the efficiency of the battery management system and the internal electronics. On a 95-degree day, a unit sitting in full sun can have its surface temperature climb high enough that the BMS begins to throttle input to protect the battery. Owner data collected by backuppowerhub.com consistently shows improved real-world charging input when the unit is kept cool during charging compared to units sitting in the sun alongside their panels.
The practical solution is a 3-meter or longer extension cable between the panel and the unit. This lets the panel face south in full sun while the unit sits in a shaded spot, under a tree, under an awning, or inside a vehicle hatch or tent with the cable running through a small gap. The extension cable costs a few watts in resistive loss, but in hot weather the reduction in thermal throttling can more than make up for it. This is part of a broader set of decisions covered in the guide to solar generator panel setup, where connector types and cable compatibility are covered in detail.
In cold weather the calculation flips. Cold reduces battery capacity and can trigger BMS protection at charging temperatures below freezing. In cold conditions, placing the unit where it can absorb some ambient warmth, inside a tent or insulated bag, is more useful than keeping it cool. The panel still goes in full sun, but the unit benefits from some protection against the cold.
Across the full range of conditions I have seen, the habit of separating the panel from the unit provides the most consistent improvement for owners who are doing regular charging in warm climates or peak summer use. If you are already doing everything above correctly and still getting lower output than expected, this placement habit is the one I check next.

This 10-foot, 12AWG copper cable splits from a single MC4 connector into four branch plugs covering XT60, Anderson, DC7909, and DC8020, making it compatible with most major portable power stations on the market. IP68-rated MC4 plugs handle up to 28A with minimal power loss, and thick PVC insulation resists UV, heat, and corrosion. Backed by a 24-month warranty from a US-based company.
Check On AmazonIf you click this link and buy, we earn a commission at no additional cost to you.
Final Thoughts: Five Minutes of Setup for Significantly Better Output
None of the adjustments in this guide are complicated. Face south, tilt at roughly your latitude, adjust steeper in winter, prop the kickstand higher if needed, check for shade, and move the unit out of direct sun. That covers the practical angle and placement decisions for foldable panels in real-world use. None of it requires tools, specialized equipment, or a detailed calculation.
The payoff is real. A well-placed 200W panel in a mid-latitude location during a clear winter day can produce 140 to 170 watts at the right angle versus 90 to 110 watts lying flat. That difference, over a 5-hour charging window, translates to adding roughly 450 to 550Wh from the flat setup versus 700 to 850Wh from the better-angled one. On a 2000Wh battery starting at 20 percent, that means ending somewhere in the mid-40s percent range instead of the mid-50s to low-60s. For anyone relying on the unit through a multi-day outage or a remote camping trip, that gap matters.
For the broader context of using your unit correctly from setup through long-term care, the complete solar generator operational guide covers all the post-purchase decisions in one place. Panel placement is one part of a larger picture, and getting the full setup right from the beginning pays off in longevity and reliability.

This 1kWh LFP battery station charges from 0 to 80% in just 50 minutes via AC input, and its LiFePO4 chemistry delivers a 3,000 plus cycle lifespan that is roughly 6 times longer than standard lithium batteries. Capacity is expandable up to 3kWh with additional batteries, making it well suited for camping, RVs, or off-grid living. Its 1,800W output powers across 15 outlets, handling around 90% of household appliances, and accepts up to 500W of solar input for clean, fuel-free charging. The package includes a 5-year customer service guarantee.
Check On AmazonIf you click this link and buy, we earn a commission at no additional cost to you.
FAQs
🧭 What direction should I face a portable solar panel?
Face it due south if you are in the northern hemisphere. South-facing panels produce the most total output over a full day because they follow the sun’s arc across the sky. East and west orientations lose 15 to 25 percent of daily output compared to south.
📐 What angle should I set my portable solar panel at?
A good starting point is your latitude in degrees from horizontal. At 40 degrees north, aim for roughly 40 degrees of tilt. In summer, flatten it by about 15 degrees. In winter, steepen it by about 15 degrees. Precision matters less than getting into the right general range.
☁️ Does partial shade really matter that much for a portable panel?
Yes, and more than most people expect. A shadow covering even one cell in a panel can reduce total output by 20 to 50 percent, depending on how the panel’s bypass diodes are wired. Always check the panel’s full surface for shade from trees, poles, or structures before leaving it for an extended session.
🌡️ Does it matter if the solar generator itself sits in direct sun while charging?
It does, especially in warm weather. Heat causes the battery management system to throttle charging input to protect the battery. Placing the unit in shade while the panel faces the sun, using an extension cable between them, produces better real-world input on hot days compared to leaving both in direct sun.
🔌 Can I use an extension cable between my panel and solar generator without losing too much power?
A standard 3-meter extension cable introduces a small resistive loss, typically under 5 percent for the current and wire gauge involved. The thermal benefit of keeping the unit in shade during warm-weather charging more than compensates for this loss in most cases. Use a cable with the correct connector type for your unit and verify the cable’s wire gauge is appropriate for your panel’s current output.
❄️ Does cold weather affect the optimal placement for portable solar panels?
Cold weather affects the unit more than the panel. At temperatures below freezing, the battery management system may reduce or stop charging to prevent lithium plating. Keep the unit insulated or in a sheltered spot in cold conditions, while the panel itself stays in full sun. Steepen the panel angle in winter to capture more output from the lower sun angle.