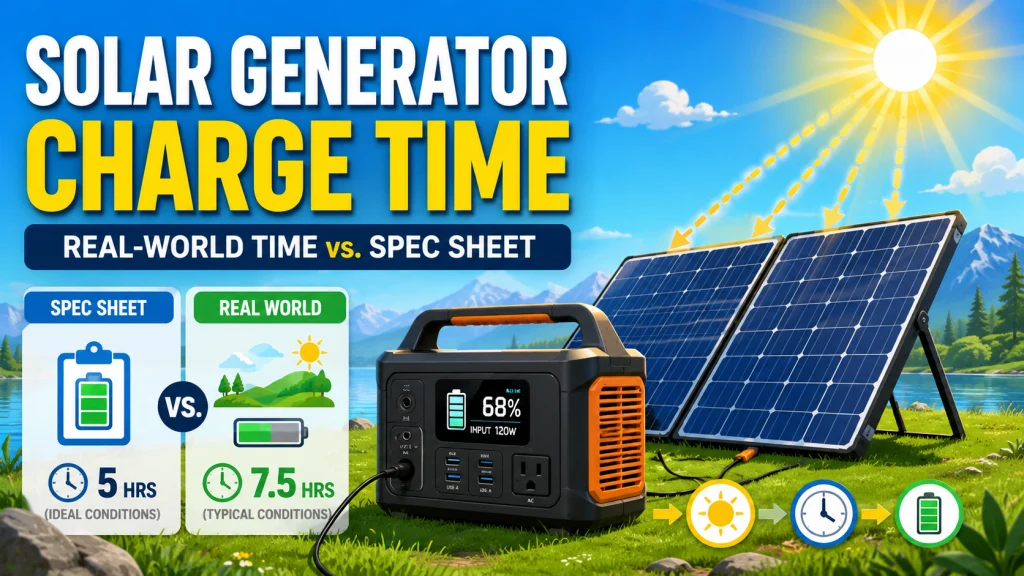
Why the Spec Sheet Charging Time Is a Best-Case Number
Every solar charging time you see on a product page or on the box is calculated from a very specific set of conditions: panels running at their full rated wattage, sun hitting the panel surface at a perfectly perpendicular angle, panel temperature sitting at exactly 25 degrees Celsius, zero shading from any direction, and no line losses between the panel and the unit. That scenario exists in a calibration lab. It does not exist on your driveway, at a campsite, or in a backyard in July.
In practice, real-world solar panel output runs at about 70 to 80 percent of the rated wattage under genuinely good conditions. That gap alone pushes actual charging times 20 to 40 percent beyond what the box says. Add any shade, a hot ambient temperature, or panels pointed at a less-than-ideal angle, and the real time stretches further. This is not a defect. It is just how photovoltaics behave outside a controlled environment, and once you account for it in your math, you will stop being caught off guard by it.
Field Note: One pattern I ran into regularly at the shop was buyers who set up a panel in the afternoon with the sun already moving west, then called in because it was barely charging. They were getting 40 to 50 percent of rated output because the panel angle was off by 30 or 40 degrees and the sun position had dropped the effective irradiance significantly. The spec sheet assumes a perfectly oriented panel at solar noon. Their setup looked fine visually but did not match those conditions at all, and the charging time roughly doubled as a result.
The Real Charging Time Formula
The calculation itself is straightforward once you know which number to use. Instead of plugging in your panel’s rated wattage, use 75 percent of it. That single adjustment brings the estimate much closer to what you will actually see on a clear day with decent placement. It is not a perfect number for every condition, but it is a much more honest planning figure than the spec sheet gives you.
The formula: divide your battery’s capacity in watt-hours by your panel’s real-world output, which is the rated watts multiplied by 0.75. The result is the estimated hours to reach a full charge from empty, not accounting for the final 10 to 15 percent where the charge rate naturally slows during the absorption phase. To make this concrete: a 2,000 Wh battery with a single 200-watt panel. Rated output times 0.75 gives you 150 watts of real-world input. Divide 2,000 by 150 and you get roughly 13.3 hours. A spec sheet for that combination might list 10 hours. Independent real-world testing of a roughly 2,000 Wh station paired with a single 200 W panel has consistently come in around 12 hours under good conditions, which sits between the spec estimate and the formula output depending on the day’s actual solar irradiance. For planning purposes, 13 hours is the number I would use.
The table below runs that same formula across the most common battery and panel combinations so you have a reference point without needing to calculate each time. The spec column reflects what manufacturers typically advertise. The real-world column applies the 75 percent correction.
| Battery Capacity | Panel Wattage | Spec Sheet Estimate | Real-World Estimate (75% output factor) |
|---|---|---|---|
| 500 Wh | 100 W | ~5 hrs | ~6.5 hrs |
| 1,000 Wh | 100 W | ~10 hrs | ~13.5 hrs |
| 1,000 Wh | 200 W | ~5 hrs | ~6.5 hrs |
| 2,000 Wh | 200 W | ~10 hrs | ~13.5 hrs |
| 2,000 Wh | 400 W | ~5 hrs | ~6.5 hrs |
| 3,000 Wh | 400 W | ~7.5 hrs | ~10 hrs |
A few things worth noting from these numbers. First, they assume you are starting from a fully depleted battery, which most owners rarely do. Adjust proportionally based on your actual starting point: for a 1,000 Wh unit sitting at 40 percent charge, run the formula on the remaining 600 Wh, not the full 1,000 Wh. Second, the 10 to 15 percent absorption phase at the end of charging is slower than the bulk phase before it. If you are recharging for same-day use rather than full storage, stopping at 80 to 85 percent saves meaningful time with very little impact on available runtime. That is a practical distinction worth building into your planning, especially if you need the unit ready within a fixed window. Third, all estimates assume a clear sky with no shade and reasonably good sun angle. Any deviation from those conditions and the actual time climbs further above the real-world column, not below it.

Built with monocrystalline cells at 23 to 25% conversion efficiency, this IP68-rated panel delivers 200W output and works with both 12V and 24V systems, including car refrigerators, air pumps, and most major power stations. It unfolds to 80.83 by 21.15 inches and folds back down for easy transport via an integrated carry handle. Designed to pair seamlessly with the full ALLPOWERS solar generator lineup.
Check On AmazonIf you click this link and buy, we earn a commission at no additional cost to you.
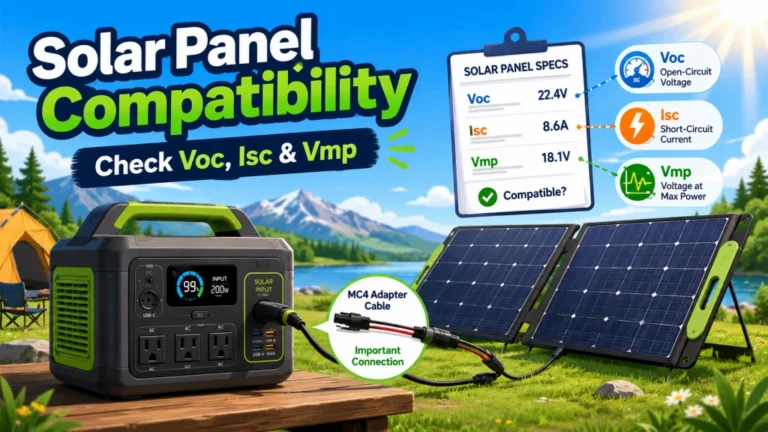
Your Unit’s Maximum Solar Input Is the Hard Ceiling
There is one spec that causes more frustration than almost anything else in the solar charging process, and most owners never look it up before buying more panels. It is the unit’s maximum solar input wattage. Every solar generator has a built-in charge controller that sets an absolute ceiling on how many watts of solar input it will accept. Once you hit that limit, additional panels produce exactly zero additional charging speed. The charge controller throttles input to its maximum regardless of what the panels are capable of supplying.
Compact units in the 500 to 1,000 Wh range typically cap solar input at 100 to 200 watts. Mid-size units in the 1,500 to 2,000 Wh range commonly accept 400 to 600 watts. Larger units above 2,000 Wh sometimes accept 800 watts or more. The specific limit is always in the spec sheet under “Solar Charging Input” or “Max Solar Input.” That number, not the panel’s wattage, is what actually determines your maximum solar charging rate.
I have seen buyers add a 400-watt panel to a compact unit that maxes out at 200 watts of solar input, expecting the larger panel to cut their charging time significantly. The panel is capable of producing more. The unit cannot use it. The charge controller clamps the input at its ceiling and the charging time stays exactly the same as it was with the smaller panel. It is one of those situations where spending more on hardware produces no benefit at all unless you first check whether the unit can actually accept what you are adding.
This ceiling is also why two units with the same battery capacity can have completely different solar charging profiles. A 2,000 Wh unit with a 200 W solar input ceiling takes roughly 13 hours to charge under real-world conditions regardless of panel additions. A 2,000 Wh unit with a 500 W solar input ceiling can charge in 5 to 6 hours with the right panel configuration. Same battery, completely different usability in an off-grid situation, based entirely on one spec most buyers never compare.
Key point: Before buying more panels, check three things: your unit’s maximum solar input in watts, your current panel’s real-world output after the 0.75 correction, and how many usable sun hours your location gets in the season you plan to use it. Those three numbers tell you whether more panels will actually help and by how much.
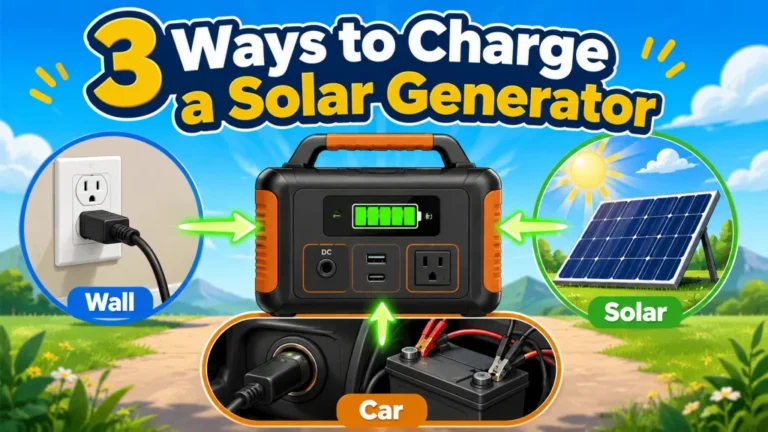
If you are deciding between units and solar charging speed matters to you, the solar input ceiling is one of the first numbers to compare. The broader picture of how all three charging methods work together is covered in the guide on how to charge a solar generator, including where solar fits relative to AC wall and car charging.

At 39.5 lbs with 2,042Wh capacity and 2,200W output, this CTB-built station is 41% lighter and 34% smaller than typical 2kWh units. It charges from 0 to 80% in just 66 minutes via AC, operates at under 30 dB in silent mode, and switches to UPS backup in under 20 milliseconds. The LiFePO4 battery is rated for a full 10-year lifespan.
Check On AmazonIf you click this link and buy, we earn a commission at no additional cost to you.
Two More Factors That Quietly Slow Your Charging
Heat and Panel Derating
Solar panels are rated at 25 degrees Celsius panel temperature, which is not air temperature. On a hot summer day with an ambient air temperature around 35 degrees Celsius (roughly 95 degrees Fahrenheit), the actual panel surface temperature can climb to 55 or 60 degrees Celsius. At those temperatures, panel output drops meaningfully. A 200-watt panel in those conditions may produce only 160 to 170 watts despite bright sun and clear sky. The irradiance is there. The panel efficiency has dropped because of heat.
This is the part most people find counterintuitive: a cool clear spring day with equivalent sun intensity will charge faster than a hot July afternoon. If your setup allows it, any airflow under the panels helps. Panels that are elevated even slightly off the ground run cooler than panels lying flat on a surface, because the underside can shed some heat. It is not a dramatic difference in every case, but it is a real one, and it is worth keeping in mind when the charging time on a hot clear day comes in slower than you expected.
Partial Shade and Why It Hits Harder Than You Expect
Shade does not affect solar panels the way most people assume it does. One shaded cell in a panel does not reduce output proportionally to the area shaded. Depending on how the bypass diodes in that panel are designed, a single branch shadow across one corner can reduce total panel output by 20 to 50 percent for as long as that shadow persists. You are not losing 5 percent of output from a shaded corner. You may be losing close to half the panel’s production from what looks like a small shadow on one edge.
The practical takeaway is simple: if any part of the panel surface is in shade, the whole panel is effectively compromised. Before setting up, look at where shadows will fall across the panel surface over the next two to four hours, not just at the moment of setup. A position that is in full sun at 10 in the morning may have a tree branch crossing it by noon. Finding true full-sun placement for the duration of charging makes a larger difference in real charging speed than almost any other adjustment most owners can make.
- Check shadow movement before placing panels. A shadow that is off the panel edge at setup may cross it by midday as the sun angle shifts.
- Avoid placing panels next to walls, vehicles, or overhanging rooflines that cast moving partial shade through the charging window.
- When using multiple panels, how they are wired affects how much a shaded panel pulls down the rest of the array. If you are planning a multi-panel setup, the wiring approach is worth understanding before you commit to a configuration.
- When in doubt, move to open ground away from any obstruction rather than trying to work around a shaded spot with panel repositioning.

This 1kWh LFP battery station charges from 0 to 80% in just 50 minutes via AC input, and its LiFePO4 chemistry delivers a 3,000 plus cycle lifespan that is roughly 6 times longer than standard lithium batteries. Capacity is expandable up to 3kWh with additional batteries, making it well suited for camping, RVs, or off-grid living. Its 1,800W output powers across 15 outlets, handling around 90% of household appliances, and accepts up to 500W of solar input for clean, fuel-free charging. The package includes a 5-year customer service guarantee.
Check On AmazonIf you click this link and buy, we earn a commission at no additional cost to you.
Final Thoughts: Use Real Numbers, Not the Box
For day-to-day planning without running the full formula every time, take the spec sheet solar charging time and multiply it by 1.3. That gets you close to a realistic estimate for a good clear day with decent placement. If the conditions are less than ideal, add more buffer. And if you only need the unit charged to a usable level rather than completely full, remember that the final absorption phase takes longer than the bulk charge before it. Planning to 80 percent instead of 100 percent often saves an hour or two with very little practical cost.
Solar charging is one part of owning and operating one of these units well. The complete operational guide for solar generator owners covers the full picture from first charge through long-term maintenance, including what to do when something stops working the way it should.

Built with monocrystalline cells at 22.4% conversion efficiency, this 35.3 lb foldable panel uses MPPT optimization when paired with EcoFlow power stations for peak output in any weather. Layered EVA and fiberglass construction with IP68 waterproofing ensures long-term durability on the road, and the adjustable carry case makes transport straightforward.
Check On AmazonIf you click this link and buy, we earn a commission at no additional cost to you.
FAQs
⏱️ How long does it actually take to charge a solar generator with solar panels?
Divide your battery’s watt-hour capacity by 75 percent of your panel’s rated wattage for a realistic estimate. A 1,000 Wh unit with a 200-watt panel charges in roughly 6.5 to 7 hours under good conditions, not the 5 hours the spec sheet typically suggests. Starting battery level, shade, and ambient temperature all affect the actual result on a given day.
📋 Why is my solar generator charging slower than the spec says?
Spec sheet charging times assume panels running at full rated output under ideal lab conditions. Real-world output runs at 70 to 80 percent of rated wattage at best, even on a good day. Panel angle, shade, heat derating, and your unit’s own maximum solar input ceiling all push the actual time above the spec. A 20 to 35 percent slower rate than the spec is normal and expected.
🔌 Does adding more solar panels always charge faster?
Only up to the unit’s maximum solar input wattage. Once you reach that ceiling, additional panels produce no additional charging speed. Check your unit’s spec sheet for “Max Solar Input” before adding panels. A compact unit capped at 150 or 200 watts gains nothing from a 400-watt panel setup.
🌡️ Does temperature affect how fast a solar generator charges from panels?
Yes. High ambient temperatures cause panel surfaces to overheat, which reduces efficiency even in bright sun. A 200-watt panel in hot summer conditions may produce only 160 to 170 watts. A cooler spring day with equivalent sun intensity will produce more usable power and result in a faster charge.
🌿 How much does partial shade affect solar charging time?
More than most people expect. One shaded cell can reduce total panel output by 20 to 50 percent, not just the shaded portion. Placing panels in unobstructed full sun for the full charging window typically makes a larger practical difference than any other adjustment most owners can make on-site.
🧮 What is the formula for calculating solar generator recharge time?
Battery capacity in watt-hours divided by (panel rated watts times 0.75) equals estimated hours to a full charge from empty. For a 1,500 Wh battery with a 200-watt panel: 1,500 divided by 150 equals 10 hours. This gives a realistic planning estimate for a clear day starting from a fully depleted battery.